import javafx.application.Application;
import javafx.stage.Stage;

public class MyApp extends Application {

    public static void main(String[] args) {
        launch();
    }

    @Override
    public void start(Stage stage) throws Exception {
        stage.setTitle("Default window");
        stage.setResizable(false);
        stage.show();

        Stage bob = new Stage();
        bob.setWidth(400);
        bob.setHeight(300);
        bob.centerOnScreen();
        bob.setTitle("Bob's window");
        bob.show();
    }
}
Now that you have a Stage/window, it's time to add content.
In JavaFX, you add a Scene to a Stage and the Scene is what holds the content. It's like having a Television (Stage) that has the ability to change channels (Scenes).
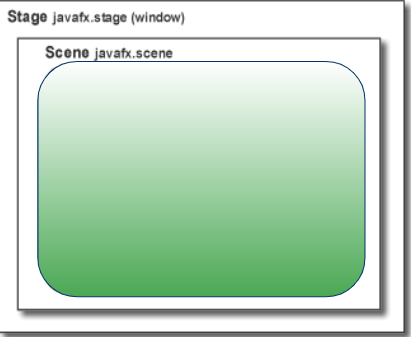
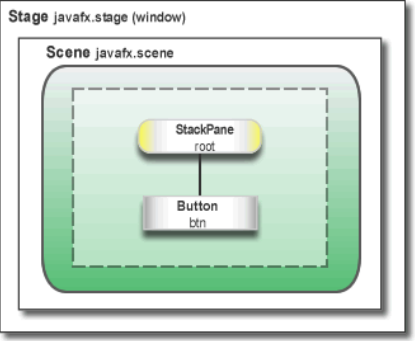
Instead of adding content directly to a Scene, content is added to what's called a Parent Node or "root node" of the Scene. The parent controls how everything in the Scene will be arranged.
In the example below, the scene's "root node" is a StackPane object which means that all objects will be stacked on top of each other. Since there's only one Button in the scene, it won't matter. If there were two Buttons, however, they would be placed on top of each other and overlap.
To create a Scene, you specify the Scene's Parent along with any other constructor parameters such as width and height of the Scene. (See the Scene API)
The Parent of a Scene controls how the Scene contents will be arranged and how the content responds to window resizing.
Things to know about a scene's Parent:
It's called a "root node"
It's what you add everything else to, like Buttons, Sliders, Images, etc.
It controls how the content is laid out (in a row, in a grid, freeform, resizable or not, etc)
The Parent of a Scene should be one of these:
Group - Use this if you want to hardcode the position of your contents. The size of a Group is the minimum rectangle size needed to hold all its children.
Region - Use a subclass of Region if you want your content to be automatically positioned. A few useful kinds of regions are:
FlowPane Content is laid out left to right with line wrapping at edges.
HBox, VBox Content is laid out horizontally or vertically
GridPane Content is put into a grid structure
BorderPane Content is laid out in 5 sections: left, right, top, bottom, center
Once you have created a Scene, tell the Stage to display it by calling
Now that you have a Scene, you can add content to its root node.
In JavaFX, all content you add must be a descendent of the Node class.
The Node class is the basis for everything GUI related in JavaFX:
Standard GUI elements: Button, Label, TextField, TextArea, Slider, etc.
Graphical elements: Canvas, ImageView, MediaView, Shape, etc.
Layout managers: FlowPane, HBox, VBox, GridPane, BorderPane, etc.
To add content, ask the root node for its list of children and then add any Node object to the list.
rootNode.getChildren().add(Node)
Here is a example code for a Stage whose Scene uses an HBox root node with two Buttons in it. When you run the code, it creates a window that looks like this:
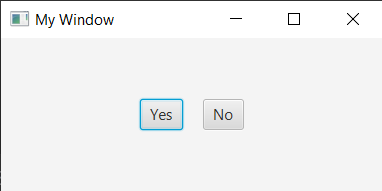
Here's the code:
import javafx.application.Application;
import javafx.geometry.Pos;
import javafx.scene.Scene;
import javafx.scene.control.Button;
import javafx.scene.layout.HBox;
import javafx.stage.Stage;

public class MyApp extends Application {

    public static void main(String[] args) {
        launch(args);
    }

    @Override
    public void start(Stage stage) throws Exception {
        // Set properties of our window
        stage.setTitle("My Window");
        stage.setWidth(400);
        stage.setHeight(200);

        // Choose an overall layout manager as the root node.
        // Here, we have chosen HBox, which automatically arranges
        // its children in a horizontal row.
        HBox root = new HBox();
        root.setSpacing(20);
        root.setAlignment(Pos.CENTER);

        // Create two Buttons
        Button yesButton = new Button("Yes");
        Button noButton = new Button("No");

        // Add the buttons to our root node's list of children
        root.getChildren().addAll(yesButton, noButton);

        // Create a new scene with our root node as the base
        Scene myScene = new Scene(root);

        // Tell the Stage to display our scene
        stage.setScene(myScene);

        // Finally, show the window.  It's invisible until you show it.
        stage.show();
    }
}