JavaFX Lab 4.2 LifeGUI 1.0
Overview
In this lab we will take your old Life.java program and connect it to a modified version of your JavaFX GridViewer program.
- Start by copying your GridViewer project code into a new project named LifeGUI
- Rename your GridViewer class to
PX_LastName_FirstName_LifeGUI_1
Model-View-Controller
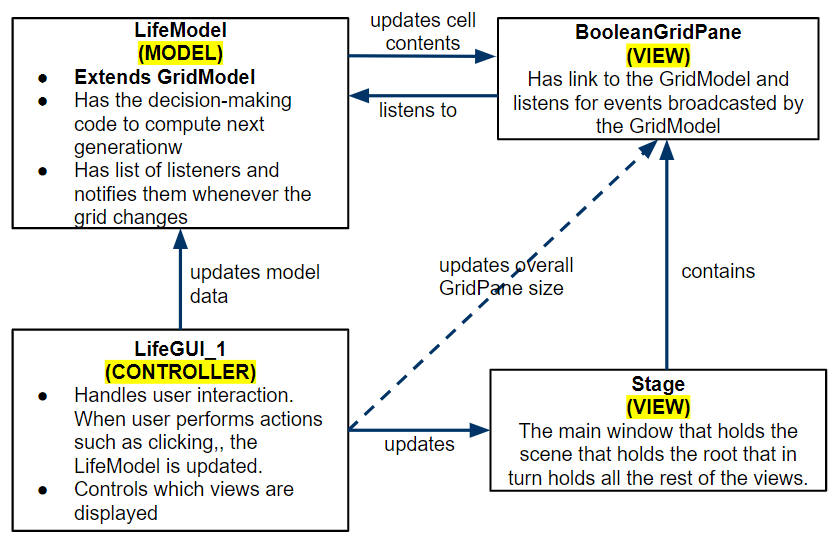
Extending GridModel
Copy your Life class from Lesson 23 into your LifeGUI project.
- Refactor/Rename your Life class to LifeModel
- Modify the class so it
extends GridModel<Boolean>
Because GridModel has a non-default constructor, you will need to provide the same constructor in your LifeModel class and use the super keyword to invoke the parent constructor. You can get rid of any old Life constructors.
Remove the old 2D array attribute from your Life class because the GridModel<Boolean> will be your model and hold the data.
Replace all code accessing or setting values of your old 2D array so it uses the methods inherited from GridModel instead.
- getNumRows()
- getNumCols()
- getValueAt(int row, int col)
- setValueAt(int row, int col, T val)
- setGrid(T[][] grid)
For example, something like this:
if (getNumNeighbors(row, col) == 3) {
    arr[row][co] = '*';
}
would become
if (getNumNeighbors(row, col) == 3) {
    setValueAt(row, col, true);
}
Connect Life to your GUI
Since your Life class is now a GridModel<Boolean>, you can simply change your previous GridModel<Boolean> instance variable (probably called model) into a LifeModel instance variable instead. This is done in your main LifeGUI class.
Next, create a "Next Generation" button that calls nextGeneration() on your LifeModel.
When the Next Generation button is pressed, your view should automatically display the next generation because we already set up the code so that whenever the model changes, the view automatically diplays the new model data.
GenerationListener
Create a Label somewhere on your GUI that displays the current generation #
When the user presses the Next Generation button, rather than directly modifying the generation label's text when the button is pressed, use a model-view-controller design. Since the current generation # is kept in the database (LifeModel), we want to set up our code so that whenever the generation value changes in the database (LifeModel), each of the views that displays the generation text (we only have one but there could be several) will be notified and update themselves. In order to do this, continue with the directions shown here.
Create an interface named GenerationListener (separate file) that has a single method:
public void generationChanged(int oldVal, int newVal);
Add an ArrayList of GenerationListener objects to your LifeModel class and instantiate it in the LifeModel constructor.
Add the following methods to your LifeModel class:
// adds the listener to the ArrayList of GenerationListener objects
void addGenerationListener(GenerationListener l)

// removes the listener from the ArrayList of GenerationListener objects
void removeGenerationListener(GenerationListener l)

// sets the generation and calls generationChanged on each listener
void setGeneration(int gen)

// gets the generation
int getGeneration()
Wherever your code modifies the generation you should use setGeneration() instead so the listeners are notified. For example, generation++ would become setGeneration(getGeneration() + 1)
Make your LifeGUI class implement the GenerationListener interface
Tell your LifeGUI to add itself as a GenerationListener of your LifeModel
Each listener has a generationChanged method. In that method, update the text that displays the generatioin to show the new value of the generation.
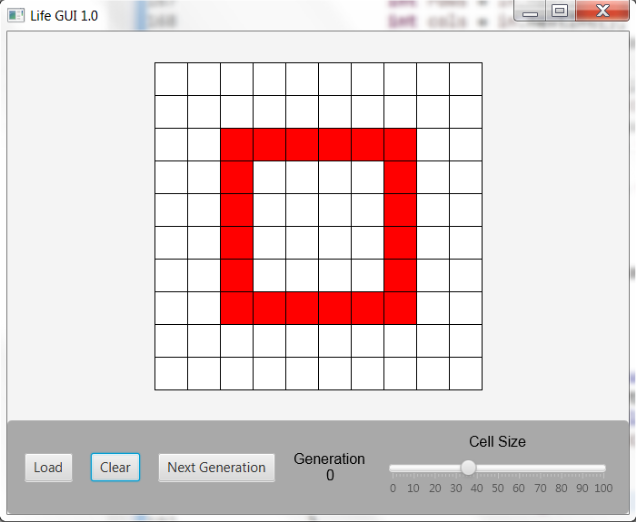
So far, you should have something like this:
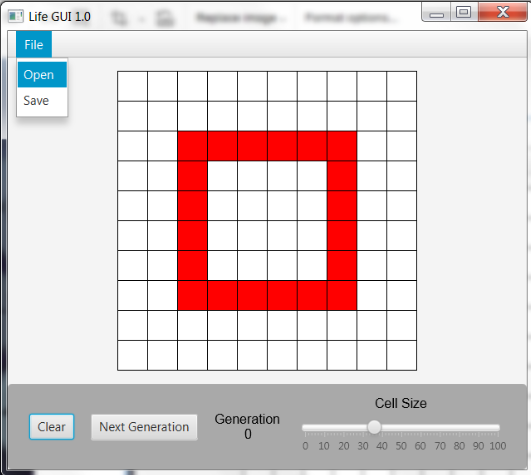
Remove the Load button and replace it with a Menu that has an Open feature and a Save feature. The result should look something like this:
- Create a MenuBar (import javafx.scene.control.MenuBar)
- Create a Menu (import javafx.scene.control.Menu)
- Create two MenuItems, one for "Open" and one for "Save" (import javafx.scene.control.MenuItem)
Add the MenuItems to the Menu
menu.getItems().add(item)
Add the Menu to the MenuBar
menubar.getMenus().add(menu)
Add the Menubar to your root pane wherever you want it to appear
You can attach event handlers to menu items using
- First create a private inner class that implements
EventHandler<ActionEvent>
- Then pass that kind of object into the menu item's setOnAction method.
For additional examples, read the Oracle JavaFX Menu Tutorial
Loading and Saving Files
The "Open" menu item does the same thing as the old "Load" button in you GridViewer program. Just move your code over.
The "Save" menu item should save the model in the same format as you have been loading. An example of the file format is shown below, where to first line of the file is how many rows and columns, followed by X and O characters representing true and false cell values.
4 5
X O X X O
X O X O X
X O X O X
X O O O X
To load a file in GridViewer, you used the FileChooser method showOpenDialog(). It's the same in this lab.
To save a file, use the FileChooser method showSaveDialog(). Then create a FileWriter object and write the information to the file just as you learned in Lesson 13.
Better Mouse Behavior
As of now, cells are turned on/off by clicking them. Let's improve the mouse behavior by changing it to:
- If the mouse is pressed or dragged on a cell using the PRIMARY button (usually the left button) then turn the cell on.
- If the mouse is pressed or dragged on a cell using the SECONDARY button (usually the right button) then turn the cell off.
Do this by getting rid of setOnMouseClicked on your view. Instead, add setOnMousePressed and setOnMouseDragged to your view.
Inside your mouse handler code:
- Use e.getEventType() to determine the kind of event (press or drag). Compare it using .equals(MouseEvent._______)
- Use e.getButton() to determine the button pressed during the event. Compare it using == MouseButton._______
Look at the constants defined in the MouseEvent and MouseButton classes. For example MouseButton.MIDDLE is the constant representing the middle mouse button.
Feature Requirements
- Your LifeModel class extends
GridModel<Boolean>.
- You have removed all references to the old 2D array you used in your original Life program. (Instead, your code uses getter/setter methods inherited from GridModel to update cell data.)
- Your code uses the custom GenerationListener interface defined in the directions above.
- Your LifeModel keeps track of GenerationListeners and informs them when generation changes.
- When the user clicks OR drags on the grid with the
PRIMARY_BUTTON it sets that cell to ALIVE and when using the SECONDARY_BUTTON it sets the cell to DEAD.
- You have menus with options for Open and Save. Open loads a new data file and sets generation to 0. Saving saves the model to disk.
- The current generation is displayed somewhere in the GUI
- You have a "Next Generation" Button that computes and displays the next gen.
- You have a Clear button that resets the grid to empty and sets the generation to 0
- Your have a Slider changes the tile size.
Optional Features
When loading a file, automatically set the tile size so the view is maximized within the center area. This is a "zoom to fit" feature.
Add a ScrollPane to the center region so that if the user drags the tile size slider larger than can fit in the center area, scroll bars will appear allowing the user to scroll around.
What to submit
Submit your LifeModel and LifeGUI classes:
PX_LastName_FirstName_LifeModelPX_LastName_FirstName_LifeGUI_1
You must Sign In to submit to this assignment