Lab 7.4 Minesweeper GUI Basics
Assignment
In this lab, you will get your View to correctly display the Model and the game will work with basic features implemented.
MVC Review
- The Model is the class that handles backend data operations (your MinesweeperModel )
- The View is whatever you displayed the blank tile images in for Lab 7.3 Minesweeper GUI Template. Maybe it was a Group, GridPane, or custom Pane like the BooleanGridPane from Life.
- The Controller is the part of your code that handles input events (probably defined in your overall GUI class)
Displaying the Model
Your first goal is to have your View display the model. In the previous lab, you already chose a type of View container to display images. The two most common are:
The View is one large Group that displays the board by calculating the position of each tile, and then draws whatever image is required at each location based on the Model data. When the user clicks the Group, you must calculate which cell was clicked and tell the Model to reveal that cell, Flag it, etc. This is the style that was used in GridModel for the Life program.
The View is a custom GridPane class that stores a 2D array of ImageView objects that know their (row, col) position in the GridPane. In this style, you would update View by updating each ImageView to reflect the Model. When the user clicks any of the ImageView objects, they will automatically know their own location which you can then pass on to the Model. Or, instead of using custom ImageView objects you can use standard ImageView objects with GridPane.getRowIndex() and GridPane.getColumnIndex() on the ImageView that was selected.
First you need to decide if you want to add mouse listeners to your entire View itself or to each ImageView within the View. It can be done eithe way.
- If you add mouse listeners to the View itself then you will need to convert the mouse location (x, y) within the View into a (row, col) just like we did in LifeGUI.
- If you add mouse listeners to each ImageView within your View then you can ask the ImageView that was clicked for its row, col position in the View. For example, if you used a GridPane then you can use the getRowIndex and getColumnIndex methods of GridPane to ask the ImageView that was clicked on for its row/col. Or, if you used something other than GridPane you can always use custom ImageView objects (extend ImageView) that keep track of their position within your View.
Once you know where the user clicked you can ask the Model questions and take action. For example, if the cell clicked is not revealed and is not a flag or question mark, then call model.reveal(row, col) on that cell. Then call updateView() to update what the user sees.
Now it's time to connect your View and Model via the Controller.
Connecting your View to your Model
- Add a Model attribute to your Controller class (the overall GUI class) and instantiate it in your start() method.
- To get your View to display your Model, add an updateView() method to the Controller that asks the Model questions and tells the View what to show.
void updateView() {
    loop through each row/col of the View (double loop)
        // Ask the model questions and update the View. For example:
        if (model.isCovered(row, col)) {
            if (model.isFlagged(row, col))
                Set the image at (row, col) to FLAG image in the View
                You can change an ImageView's image using setImage()
            else set image to blank tile
        }
        else if (!model.isCovered(row, col) {
            ...
Note 1
When changing images, don't create a new ImageView. Just update the image of the existing ImageView at that location using the setImage() method of ImageView.
Note 2
If you can't ask the View what ImageView is at a (row, col) location then keep your ImageViews in a separate 2D array of ImageView objects. Then you can always access them.
EventHandler and MouseEvent Tips
EventHandler Tips
- If an EventHandler needs to do something short and simple like reset the Model then use an anonymous class or lambda expression.
- If an EventHandler needs to do more complicated logic that takes more space then use a private inner class or a separate class.
MouseEvent Tips
If you have one EventHandler handling multiple types of MouseEvents (ex: mouseReleased vs mouseClicked) you can distinguish them by asking what kind of event the parameter is. For example:
if (e.getEventType() == MouseEvent.MOUSE_PRESSED)
You can find out which mouse button was used during a MouseEvent by asking something like
if (e.getButton() == MouseButton.PRIMARY)
Lab Requirements
Your program needs the required items listed below.
- A MenuBar with Menus that have these MenuItems
- Game Menu (required)
- New Beginner Game (required)
- New Intermediate Game (optional)
- New Expert Game (optional)
- New Custom Game (optional)
- Exit (required)
- Options Menu (optional)
- Set Number of Mines (optional)
- Set Grid Size (optional)
- Help Menu (required)
- A View of some sort in which the Minesweeper board will be displayed (required)
- This can be a Group similar to the BooleanGridPane used for LifeGUI or it can be a GridPane.
- When the user clicks a cell, recursively reveal cells and then update the view to reflect the model (required)
- Display Time Elapsed somewhere (required)
- Display Mines Remaining somewhere (required)
- Display the happy face Emoji somewhere (optional)
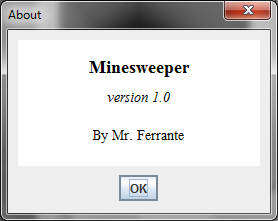
For this lab, you must implement an 'About game' option in the Help menu. Click here to see an example. To accomplish this, when the user selects 'About game' do the following:
- Create a new Stage and Scene as local variables, separate from your main Stage and Scene.
- Decide what kind of root node you want to use for your overall window layout. For example, you could use a VBox with a few labels and an Ok button at the bottom. Or, you could use a BorderPane.
- Add the info you want to display in your 'About' popup by adding JavaFX Labels, Buttons, etc.
- Show the stage.
- Add an EventHandler so that when the user clicks the 'Ok' button, the stage is closed using the
.close method of the Stage class.
Pro Tip: If you want to block the user from interacting with the game window while the About window is showing, then use the .initOwner(Stage) method of the Stage class along with the .initModality(Modality.WINDOW_MODAL) method of the Stage class. This will force the user to press your 'Ok' button before continuing their game.
Which Classes Store What
- You should have an interface named
PX_LastName_FirstName_MSModelInterface.java that specifies what methods the model must have
- You should have a class named
PX_LastName_FirstName_MinesweeperModel.java that stores the raw 2D data and handles operations on that data
- You should have a class named
PX_LastName_FirstName_MinesweeperGUI.java that sets up the main GUI.
- Where you put the Minesweeper board
View is up to you.
- It could be a standard GridPane that you keep inside
MinesweeperGUI
- It could be a separate custom class like you did using BooleanGridPane in LifeGUI.
- Where you put the Minesweeper
Controller code is up to you.
- Most likely, your Controller code is done inside your
MinesweeperGUI
- You could also make separate listener classes to handle user input. In that case, you would have a separate class as your Controller.
Controller Code
The Controller is the part of your code that handles input events and passes information between the Model and View. In the Console version of Minesweeper, your controller had a play() loop that asked for user input and then updated the model and view accordingly. In the GUI version, you don't need a loop. The GUI itself is the loop and it already sits there waiting for you to handle user input. You should get rid of your old play() loop and copy the same ideas into your GUI version. For example, when the user left-clicks on the board, you should call reveal(row, col) where the user clicked if that cell is in bounds and hasn't been revealed.
File Submission
- Go to your project folder on your computer's hard drive (in Finder for macOS or Windows Explorer for Windows)
- Compress your entire project folder into a ZIP file
- Rename the ZIP file to the format
PX_LastName_FirstName_MinesweeperBasics.zip
- Submit your ZIP file below
If your file size is over the limit, then then submit just your .java files and talk to your teacher about why your project is so large. You can probably resolve this yourself by simply scaling your images to reasonable sizes using an image editor (there are free image editors online).
You must Sign In to submit to this assignment