Building a GUI From Scratch
Base Code
You should already have a project in Eclispe that supports JavaFX. Create a new class in this project named MyGUI.
Every JavaFX program must extend Application so make yours do the same.
public class MyGUI extends Application {
The Application class contains the abstract method start(). You must implement it.
@Override
public void start(Stage stage) {

}
In the start() function, set properties for your Stage. See the Stage API for a complete list of methods. A few common methods are listed in Java FX Lesson 1 Page H.
At the end of the start() function, call show() on your Stage to display it.
Finally, create a main method and call launch() to start JavaFX. The launch() method runs setup code in the background and then calls start() for you, passing a default Stage for you to use.
Here's an outline of what you should have so far:
// import statements

public class MyGUI extends Application {

    public static void main(String[] args) {
        // Call launch() to start JavaFX.
        // Do not call start() yourself because launch() will call it for you after running other setup code.
        launch();
    }

    @Override
    public void start(Stage stage) {
        // Set whatever stage properties you'd like here
        stage.setTitle("My Window");
        stage.setWidth(400);
        // etc.

        stage.show();
    }
}
Layout Design
Next, you will need to plan out the organization of your GUI contents using a combination of JavaFX Layout Panes
- On paper, draw out the GUI design you want.
- Decide what combination of a Layout Panes you will need to achieve your design. Keep in mind that you can nest Layouts to get more complex layouts.
- Example 1: You use a VBox as your root node with three HBoxes inside the VBox. Each HBox contains a few different Control Nodes.
- Example 2: You use a BorderPane as your root node. In the top region, you put a MenuBar. In the left region you put a VBox that has sidebar navigation links. In the center region, you put a GridPane containing lots of content. You put nothing in the right region and you put a FlowPane in the bottom region that contains link to things like "Terms of Service" and "Contact Us"
Example
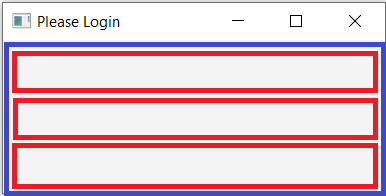
Let's say we want to create this GUI:
Among many possibilities, we could use a VBox (shown in blue) containing three HBoxes (red). The GUI items would be placed inside each HBox.
We first arrange the Layout Panes in our code:
// Overall root node
VBox root = new VBox();

// Make subcontainers to hold our GUI items
HBox topBox = new HBox();
HBox midBox = new HBox();
HBox botBox = new HBox();

// Add our subcontainers to the root node (Vbox)
root.getChildren().addAll(topBox, midBox, botBox);
Next, we create our GUI items (Control Nodes) and add them to whichever HBox they belong in.
// Overall root node
VBox root = new VBox();

// Make subcontainers to hold our GUI items
HBox topBox = new HBox();
HBox midBox = new HBox();
HBox botBox = new HBox();

// ****NEW CODE****
// Make our GUI controls
Label userNameLbl = new Label("User name");
Label passwordLbl = new Label("Password");
TextField userNameFld = new TextField();
PasswordField passwordFld = new PasswordField();
Button okBtn = new Button("Ok");
Button cancelBtn = new Button("Cancel");

// ****NEW CODE****
// Add our GUI controls to our subcontainers
topBox.getChildren().addAll(userNameLbl, userNameFld);
midBox.getChildren().addAll(passwordLbl, passwordFld);
botBox.getChildren().addAll(okBtn, cancelBtn);

// Add our subcontainers to the root node (Vbox)
root.getChildren().addAll(topBox, midBox, botBox);
Finally, we make a Scene that has our VBox as the root node and connect the Scene to the Stage using stage.setScene(scene)
// Overall root node
VBox root = new VBox();

// ****NEW CODE****
// Make a Scene that has our root node
Scene scene = new Scene(root);

// Make subcontainers to hold our GUI items
HBox topBox = new HBox();
HBox midBox = new HBox();
HBox botBox = new HBox();

// Make our GUI controls
Label userNameLbl = new Label("User name");
Label passwordLbl = new Label("Password");
TextField userNameFld = new TextField();
PasswordField passwordFld = new PasswordField();
Button okBtn = new Button("Ok");
Button cancelBtn = new Button("Cancel");

// Add our GUI controls to our subcontainers
topBox.getChildren().addAll(userNameLbl, userNameFld);
midBox.getChildren().addAll(passwordLbl, passwordFld);
botBox.getChildren().addAll(okBtn, cancelBtn);

// Add our subcontainers to the root node (Vbox)
root.getChildren().addAll(topBox, midBox, botBox);

// ****NEW CODE****
// Tell our Stage to show our Scene
stage.setScene(scene);

// ****NEW CODE****
// Show the window
stage.show();
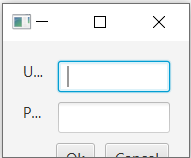
If you run this program, you'll get something like this:
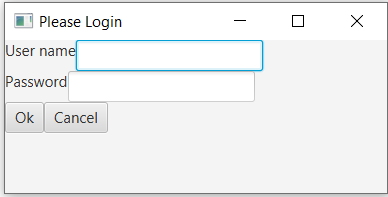
The content is correctly placed within each region, but everything is squished together. This is because we never told JavaFX any of the following:
- We want the Stage to be 400x200
- We want padding around the border of the VBox
- We want spacing between each HBox
- We want spacing between each item in the HBoxes
- We want the user name Label to be the same size as the password Label.
- We want the bottom HBox to alight the buttons on the right side.
Everything above is possible using a variety of methods:
// We want the Stage to be 400x200
stage.setWidth(400);
stage.setHeight(200);

// We want padding around the border of the VBox
root.setPadding(new Insets(20));

// We want spacing between each HBox
root.setSpacing(10);

// We want spacing between each item in the HBoxes
topBox.setSpacing(10);
midBox.setSpacing(10);
botBox.setSpacing(10);

// We want the user name Label to be the same size as the password Label.
userNameLbl.setPrefWidth(100);
passwordLbl.setPrefWidth(100);

// We want the bottom HBox to align the buttons on the right side.
botBox.setAlignment(Pos.CENTER_RIGHT);
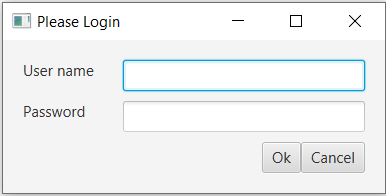
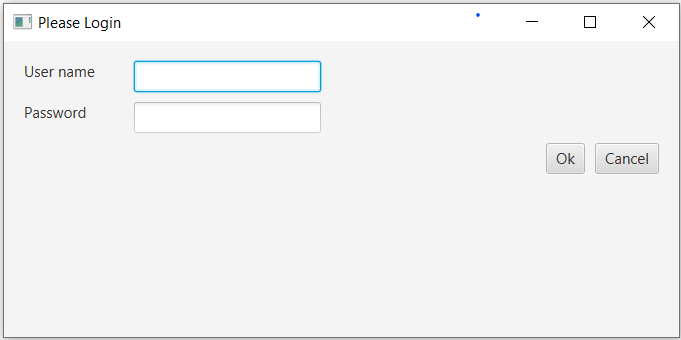
With the changes above, we get:
If you have this program running, you will notice that resizing the window creates awkward behavior. First, if the user resizes the window too small it cuts off the text labels and makes them unreadable. Resizing too small also puts the buttons out of reach. Second, if the user resizes the window too large, it creates dead space between the TextFields and the border. It also creates dead space between the buttons and bottom edge.
We can fix these things with a few more lines of code:
// Tell the Stage that it cannot be resized below 400 pixels wide
stage.setMinWidth(400);

// Tell the Stage that it cannot be resized vertically at all
stage.setMinHeight(200);
stage.setMaxHeight(200);

// Tell the Labels they can't be resized below 100 pixels wide
userNameLbl.setMinWidth(100);
passwordLbl.setMinWidth(100);

// Tell the TextField and PasswordField they should be as large as possible,
// but they can't go below 200 pixels wide
userNameFld.setPrefWidth(Integer.MAX_VALUE);
userNameFld.setMinWidth(200);
passwordFld.setPrefWidth(Integer.MAX_VALUE);
passwordFld.setMinWidth(200);
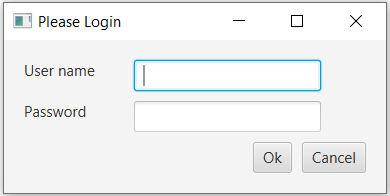
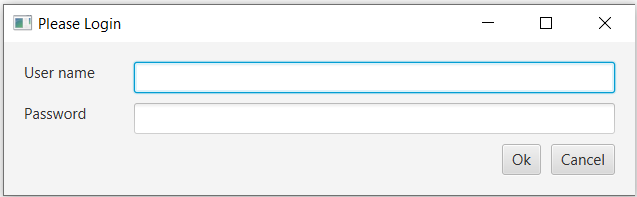
With the changes above, the user can resize the window horizontally and it responds in a reasonable way:
Instead of making the preferred width of the TextField and PasswordField be Integer.MAX_VALUE, we also could have set the Hgrow priority to ALWAYS take up extra space. If multiple Nodes compete for extra space, they will share it equally.
// Instead of userNameFld.setPrefWidth(Integer.MAX_VALUE);
HBox.setHgrow(userNameFld, Priority.ALWAYS);

// Instead of passwordFld.setPrefWidth(Integer.MAX_VALUE);
HBox.setHgrow(passwordFld, Priority.ALWAYS);
Summary
In order to get a GUI that is arranged as you want and is also resizable in a responsive way, you will need to combine multiple layouts together and likely nest them. Once you have the basic placement of Controls in their respective containers, you should specify the spacing, alignment, and size properties of the Controls and also of the containers they are in.