Lab 7.5 Minesweeper GUI Final
Overview
In this assignment, you will add features and polish to your Minesweeper program.
Displaying Pop-up Messages
In the Console version of Minesweeper, you could print out feedback to the user in the terminal window. For Minesweeper Final, you should display pop-up messages instead.
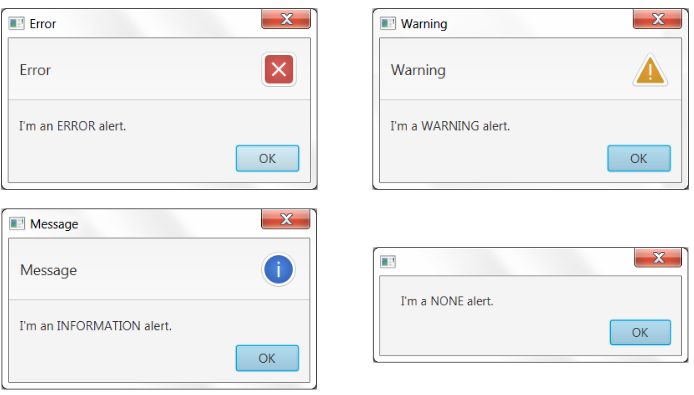
The Alerts class can create standard pop-up messages. See the Alerts API. It's easy to use. For example, if a user tries to set the number of mines to an illegal value you could display an error message stating the requirements for number of mines.
if (numMinesRequested < 1 || numMinesRequested > totalTiles - 1) {
    String message = "Sorry.  The number of mines must be between 1 and " + (totalTiles - 1);
    Alert a = new Alert(AlertType.ERROR, message, ButtonType.OK);
    a.showAndWait();
}
The showAndWait() method will display the pop-up and not allow the user to continue until they press OK.
Here are different kinds of Alerts
The TextInputDialog class can be used to get simple input from the user. See the TextInputDialog API. For example, the code below prompts for number of mines. You would need to convert the response into an integer using parseInt method of the Integer class.
TextInputDialog input = new TextInputDialog();
input.setHeaderText("How many mines would you like?");
input.showAndWait();
String answer = input.getEditor().getText();

Write a "How To Play" Webpage
One of the requirements for Minesweeper GUI Final is to write your own "How To Play" webpage in HTML.
If you already know HTML, go ahead and write your web page explaining how to play minesweeper. You can use images and CSS to make your page look good.
If you don't know HTML, you can either learn basic HTML by reading online tutorials or watching YouTube, or you can use an Online editor. If you use an online editor, you need to save the raw HTML source code as a plain-text file with the extension .html
Displaying a Webpage in JavaFX
Here's how to display HTML in a JavaFX WebView:
- Create a WebView object using the default constructor. Here's the WebView API.
- Call getEngine() on your WebView to get a WebEngine
Build a String for the URL to load.
- The URL format for webpages stored locally is
"file:///absolute_path_to_file/filename.html"
- If your webpage was stored in a subfolder named
html within your project, then you could get the absolute path by saying:
File temp = new File("html/about.html");

String url = "file:///" + temp.getAbsolutePath();
Call load(url) on the WebEngine to load the given URL
If you are using Java 10+, you will need to add javafx.web to your VM arguments. To do this, right-click your project and choose Properties. Then choose Run/Debug Settings. Edit those settings and go to the Arguments tab. Add javafx.web to the arguments list. Other modules you may need to add are: javafx.fxml and javafx.media
Which Classes Store What
- You should have an interface named
PX_LastName_FirstName_MSModelInterface.java that specifies what methods the model must have
- You should have a class named
PX_LastName_FirstName_MinesweeperModel.java that stores the raw 2D data and handles operations on that data
- You should have a class named
PX_LastName_FirstName_MinesweeperGUI.java that sets up the main GUI.
- Where you put the Minesweeper board
View is up to you.
- It could be a standard GridPane that you keep inside
MinesweeperGUI
- It could be a separate custom class like you did using BooleanGridPane in LifeGUI.
- Where you put the Minesweeper
Controller code is up to you.
- Most likely, your Controller code is done inside your
MinesweeperGUI
- You could also make separate listener classes to handle user input. In that case, you would have a separate class as your Controller.
Controller Code
The Controller is the part of your code that handles input events and passes information between the Model and View. In the Console version of Minesweeper, your controller had a play() loop that asked for user input and then updated the model and view accordingly. In the GUI version, you don't need a loop. The GUI itself is the loop and it already sits there waiting for you to handle user input. You should get rid of your old play() loop and copy the same ideas into your GUI version. For example, when the user left-clicks on the board, you should call reveal(row, col) where the user clicked if that cell is in bounds and hasn't been revealed.
Requirements Checklist
- Left-clicking recursively reveals tiles (required)
- Right-clicking cycles between flag and blank (required)
- Having an extra question mark flag is optional.
- Display Time Elapsed somewhere (required)
- Display Mines Remaining somewhere (required)
- Display the happy face Emoji somewhere (optional)
- GUI messages showing when the game is won or lost (required)
- When the game is won or lost, you should not be able to keep playing (required)
- A MenuBar with three Menus: Game, Options, Help
- Game Menu
- New Beginner Game (required) - resets the board to a new 8x8 game with 10 mines
- New Intermediate Game (required) - resets the board to a new 16x16 game w/ 40 mines
- New Expert Game (required) - resets the board to a new 16x31 game with 99 mines
- New Custom Game (required) - prompts the user for dimensions and mines then starts a new game with those settings
- Exit (required)
- Options Menu
- Set Number of Mines (required) - prompts the user for number of mines. If user enters an invalid value (less than 0 or larger than board size), pop up an error message and don't change the number of mines
- Grid Size (required) - prompt the user to enter new board dimensions (numbers of rows and columns) and start a new game using whatever max number of mines has already been set
- Help Menu
- About (required) - Displays an "About" page that states the program name, version or date, and your name
- How To Play (required) - Displays a "How To Play" page written by you. One way of doing this is to show a new Stage that displays a WebView object.
Optional Extensions
Add these extensions to make your project a portfolio piece you're proud of:
- Right-clicking cycles between blank, flag, and question mark. (The question mark means you're not sure and will come back to it.)
- Improve the look of Nodes using Special Effects (here)
- Improve interactivity by adding Animation events (here)
- Improve interactivity by adding user feedback when hovering over tiles or holding the mouse down but not yet clicking. For example, you could highlight the current cell the mouse is hovering over. Or, when the player presses the left button, the face image changes to a nervous expression until the player releases the button to reveal whatever is behind that cell.
- Improve the look by adding a background image and custom sprites. For example you can set a background image on the Scene itself or use a StackPane to drop an image and then place your minesweeper GUI on top of that.
- Improve your features by adding a "Hint" button
- Improve you features by adding an "AI Autoplay" mode
Basic idea: Use an AnimationTimer that does an action every second or so. Before the "AI" selects a move, highlight the square for one frame and then make the move. In order to decide what kind of move to make, use a state system. This means your AI is in different modes (states) based on what's going on. State 0 could be random guessing of uncovered tiles (or even better, guessing from among the uncovered tiles that have the highest chance of not being a mine). State 1 could be flagging tiles that are known 100% to be a mine. State 2 could be revealing uncovered tiles that are known to be clear due to flag placement. You would start your AI in state 0 and then go to state 1, then state 2. Keep alternating between state 1 and 2 until no known mines or empty tiles exist. Then go back to state 0. You can also add extra states for special situations.
- Add a high score feature that saves games to disk in some "encrypted" way. For example, you could add a random value to each ASCII character before writing to the file. That would make your save file be less hackable by a regular user.
File Submission
- Go to your project folder on your computer's hard drive (in Finder for macOS or Windows Explorer for Windows)
- Compress your entire project folder into a ZIP file
- Rename the ZIP file to the format
PX_LastName_FirstName_MinesweeperFinal.zip
- Submit your ZIP file below
If your file size is over the limit, then then submit just your .java files and talk to your teacher about why your project is so large. You can probably resolve this yourself by simply scaling your images to reasonable sizes using an image editor (there are free image editors online).
You must Sign In to submit to this assignment